I’m timeboxing the creation of this blog post, so I can continue to work on my game for the apple vision pro. I’ve had the thing for a week now, and in the weeks leading up to the launch date, I began working on a port of a game I’ve worked on previously (but never released) called Puzzle Prison.
I have planned (for quite a while, really) to write a blog post about how and why I never launched Puzzle Prison, but I’ll go into it briefly here. It was a game I developed for originally for Google Cardboard. I actually showed it at an event at GDC one year (2016, maybe?), and at numerous events locally around the Twin Cities. (Various VR & HCI events and meetings, Twin Cities Maker Faire, in the lobby at a TEDx event, and probably other events too.)
The game is fairly simple. It’s a SameGame variant, with the twist that the game is played on four walls, one in each direction. It is a stupidly simple way to bring a 2D grid-based game into the third dimension, and despite having lots of ideas for how to make the game better than what I describe (I implemented a few of them), the simplest game ideas are often the best ones, and the base game idea was probably the best version of it.
Here’s a trailer I put out there at some point:
One reason I never launched the thing was that new platform development kept being more compelling than launching for the current platform. By the time the game was polished enough to release for Google Cardboard, I was doing a lot of “real” (3DoF) VR development, mostly for Vive, and I decided that I thought Google Cardboard was essentially dead, and I would wait to release it when the steam version was finished. Then I had similar thoughts about SteamVR, and wanted to release it for the Oculus Quest. I really should have just launched it on iOS and Android and been done with it.
Anyway, fast forward a bunch of years to this year’s WWDC, and I’m ecstatic to be able to work on a game for Apple’s new headset in Swift! And the APIs look great! I spent some time looking through my various VR game ideas, and nothing really jumped out at me as something as easy to make as Puzzle Prison. The project has another big plus going for it, and that’s the fact that I already have a bunch of awesome audio assets that I’d love to use and include.
Okay, so it’s a week after the headset launched. Two weeks ago, I thought I’d have an app out by now. What’s the holdup?
First thing, the game is playable. I’m tempted to launch a first version as/is, and improve it incrementally. But it’s missing a lot of stuff, and for one thing, I still haven’t implemented those aforementioned audio files.
But there’s another issue I’m working through, and weirdly, it’s related to game design. The original game has what I think are pretty awesome “block breaking” animations. (I’ll get to how this is relevant in a second.) I actually think they may be some of the best animations I’ve ever created in a game. (To be honest, it might be the only animation I’ve ever created that wasn’t directly necessary for a game’s design.) The game without them is totally fine, and playable… except… they take some time. A second or two. And at some point I implemented a feature in the old version of the game where there is a multiplier. If you break more than one group at a time, it increments a multiplier, and the second group is worth more points. But because the game currently has no animation, the scoring isn’t the same as the old game.
There are other effects that I think are more important than the block breaking effect. Namely showing you when and where the game is in danger of ending, as well as an effect for when the game does actually end. Both are not just cosmetic, but have important UX impact. So they may get my attention first, but I’ll get to those block breaking animations eventually.
I wrote up a list of Apple (iOS, iPadOS, macOS) developer resources that are not directly from Apple. (Perhaps obviously, if you are wanting to get into developing for Apple’s platforms, developer.apple.com should probably be your first stop. This was written for someone who wanted links to other sites they should know about.)
I figured since I spent a bit of time compiling these, I’d re-post them here.
If you still feel like you’re getting a handle on Swift syntax, (or just want to brush up and/or clarify optionals), I highly recommend the Unwrap app. It was instrumental for me when I first started learning Swift.
Similarly (on the topic of Swift syntax) https://swiftly.dev/ is a nice “cheat sheet” style site with a lot of topics. (Made by a local dude!) He also made https://iosref.com/ which is another “cheat sheet” for various device-specific info.
All Apple developers should at least know there is a book on Swift Language syntax. Importantly, it’s updated for every new version, and you probably don’t want the version that’s currently in beta, so be aware of which one you’re reading. Also, that link is to the overall swift.org documentation, which has a bunch of other semi-interesting stuff listed too.
The Swift Package Index should probably be the first place you look for swift packages. Apple is a sponsor.
I read iOS Dev Weekly when it hits my inbox every Friday. Might not be as much beginner content there, but it’s definitely the main way I “keep up” on interesting blogs and viewpoints. The intro usually touches on any news I should be aware of as well. (The author is also the maintainer/founder of the Swift Package Index.)
Some blogs that I find myself on regularly (with really nice articles):
NSHipster is kind of in-between a blog and a reference site. It used to feel more important than it does to me now, but it’s still a really nice set of articles on some of the tricker topics you might encounter.
Hacking With Swift is a source of SO MANY good articles. I have this one on SF Symbols bookmarked, as it’s the definitive guide, IMO.
Swift By Sundel has a TON of excellent articles, and this link (the “Discover” tab) feels especially full of “required reading”. The author uses a very nice static site generator written in Swift, called Publish, on Github.
There are also a couple of relevant and local (to the Twin Cities, where I’m based, in Minnesota, USA) developer meetups:
SwiftMN is sort of the new-kid on the block. It obviously didn’t exist until Swift came about, and I was a late Swift convert (didn’t start using it until version 4), so I’ve only been to a few meetings. They have a mostly-dead slack also.
An open source example project (on GitHub it’s called SKHexGrid) for how to use a Swift package called hex-grid to generate hexagonal grids in various configurations.
An easy (and fun?!) way to draw hexagonal game boards.
Here’s some text from the newly re-worked About screen in the application:
There are a couple of other uses imagined for this application (outside of serving as a nice example for the HexGrid library):
You can configure and then Save images of hexagonal grids for use elsewhere. (For example, you might configure a grid for a board game played on a hexagonal grid, save it, then find it in your photos library and print it from there.)
So yeah, I think this first released in the app store back in March of this year (2023), although it had been on GitHub for almost a year now. I’m only just getting around to writing about it.
I guess I took a break from working on it for a while after Blither came out, but I’m back to thinking about it again, and I have a long list of things I want to make it do. You can see that list in the project README, but it’s a big bullet list that’s not really in any sort of order. I’ve written more about this below.
How did this come about?
While working on the app for Blither, I obviously needed to draw some hexagons on the screen. I had done this at least a few times previously, so of course the first thing I did was go look at my old code. The most extensive project with hexagons was of course Catchup (RIP earlier this year :sad:), but when I opened that up, I found that the hexagonal drawing was quite specific to the app, and not really all that extendible to different sizes or shapes of hexagonal grid.
I was disappointed by this revelation, and really wanted to use a library that could draw a multitude of different sized grids without too much extra effort. First-thing-first was to look to see whether such a thing already existed.
When making Catchup (and possibly even before!), I had been aware of the quite extensive tutorial on drawing hexagonal grids written by Amit Patel (Red Blob Games). That website is, as far as I can tell, the definitive guide on the subject. There are even links to other libraries, and it was there, in the Swift section, that I first found reference to the Swift package called hex-grid, that I ended up using for Blither.
So, while evaluating hex-grid, I still hadn’t quite decided what iOS framework/library I would use for drawing. Catchup uses UIKit, and I’ve used that professionally for over a decade, so it’s definitely the one I’m most familiar with. The only demo (at the time) for hex-grid was written in SwiftUI, which is Apple’s hot new declarative UI library, so I spent a bit of time with that, and realized the demo was quite limited. It really didn’t show off most of the features of the hex-grid library. (I’m also not sold on SwiftUI, but I did use it for all the menus in Blither as well as the menus in SKHexGrid, so I guess I’m coming around.)
I was starting to become familiar with hex-grid, and I decided to experiment with using SpriteKit , which is a 2D game engine/framework/library created by Apple. I’ve always avoided it because a) it’s proprietary to Apple, and b) UIKit is plenty capable of drawing a bunch of stuff really performantly, but at the same time, it has some nice capabilities, and I’d never used it before, so… why not?
Before long, I realized my “test” project (which I’d made specifically to easily switch around which grid is drawn) was a much better example of what hex-grid could do, and as I’d been in contact with the developers of that library a bit (mostly creating issues and asking them to add features for me), I showed it to them, and they promptly added it to the README.
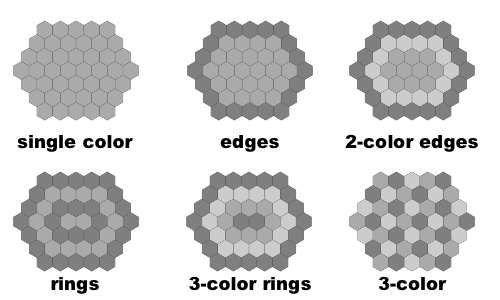
One thing I’m really proud of creating for the application is all the different ways you can configure the coloring of the hexagons inside the grid. This is functionality that is unique to SKHexGrid, and not something that comes from the hex-grid project. (This is a candidate for pulling out of this project and contributing to that one, but it just sounds like a lot of work to me.) There are the following options for shading grid cells in the application:
grid shading types built into Hexagon Grid Generator
There is also a random color shading, but I didn’t picture that here. Each of these (aside from single and random color shadings) required their own algorithm, and were pretty fun to write. I only just thought of another shading type that might be fun, so I added it to the README.
What’s next for this project?
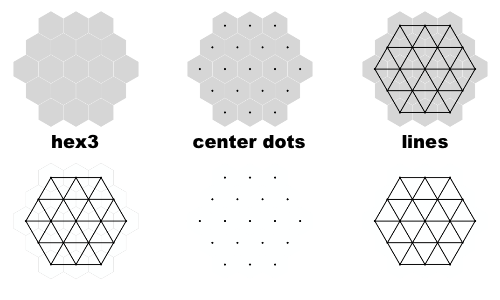
I did just yesterday submit the latest version (v.0.4.2) for app store review, so that should come out shortly. In it, I added the ability to draw and configure dots in the center of each hexagon, as well as lines between each of those center points. Just to illustrate, here are some example hexagons showing off those new features:
grids showing the new “center dots”, and “lines between center dots” features
As I said earlier, I have a long list of things I want to make the project do. I’ll just list a few of them, roughly in the order I want to work on them.
I really want to allow you to save the grid that you’ve customized, so the next time you load up the application you can see it again. This will let you toggle between different grids you’ve created, or save a “game in progress” that you’re playing with the app. But the serialization of colors makes it all a bit annoying. (SwiftUI uses a different object for colors than UIKit or SpriteKit, and it’s not serializable for some dumb reason.) I also think Apple’s new SwiftData framework is going to make syncing your serialized hexagon “save files” via iCloud a no-brainer to implement, and I’m kind of eager to play with that, so I might hold off on this feature until that is released along with the new iOS in the fall.
I think the next thing I’ll actually work on is showing coordinates not on the hexagons themselves, but as a sort of “key” along the side of the grid. This is common if you are doing any sort of annotation of your games, and should be highly configurable. Currently the cell (individual hexagon) coordinates are configurable, both in how they are displayed, as well as which coordinate “style” to use. But I’d like to be able to show the “axial” coordinate style both as two numbers (as it’s used in the library), as well as with a single number and an alphabetical character. Additionally, it would be nice to be able to “rotate” which side shows the coordinates, but I’m not yet sure how I would do that, so we’ll see.
After showing coordinates along the edges of the board, I’d also like to be able to show arbitrary colored borders for the entire grid. This is because one of the kinds of game most commonly played on hexagonal grids are connection games (like Hex). In connection games, the goal is to be the first player to have an unbroken group of your own pieces from one side of the board to the other. Or, as in The Game of Y, between 3 sides of a hexagonal board. Incidentally, showing the lines between hexes, makes the kind of board that is typical for The Game of Y possible, because (as in Go) you typically play your pieces on the intersections of lines, as opposed to inside the grid cells.
Anyway, if you’ve read this far, you are probably in the target market for this kind of application, and you should go download it now!
I’ve been waiting patiently for Apple to reveal their headset for at least 5 years now, and as of WWDC 2023, that wait is finally over. A couple of weeks later (last Tuesday), the developer tools dropped, and I finally got a chance to start working with the frameworks and applications that Apple has created for making content on their new headset.
I’ll be eagerly exploring these frameworks and playing with this tech at least until the headset is covering my eyeballs, and (hopefully) for years after. There’s literally so much here that they devoted over 40 (admittedly short) WWDC talks to the topics, (with some overlap, sure, but not as much as you’d think). I have done a fair bit of VR development in the past, and while it’s been a few years, (and I’m sure there’s been some improvement in that time), to me, Apple’s APIs seem like the most flushed-out and easy-to-use way to develop 3D applications that I have ever seen. The only downside I can imagine is the vast amount of new frameworks to learn. There are seemingly a lot of ways to approach the same problem, or similar problems anyway, and I could imagine that being daunting for a lot of people. Fortunately, the documentation is quite good.
I imagine I’ll be writing about this topic a bunch in the next few months, and for my first post on the topic I’m going to just document some of my findings about the coordinate system in visionOS. I’ll jump right in.
Where is the center of your drawing area, or x: 0, y: 0, z: 0?
In short, when you open an Immersive Space in visionOS, 0,0,0 is positioned directly beneath you.
While the immersive space remains open – even while you move around within the space – 0,0,0 doesn’t move. But if you close the immersive space, and re-open it, 0,0,0 will have moved to a new location and rotation, again directly beneath your feet, and rotated to face the same way you are facing.
So, because the coordinate space will always appear in the same orientation as you, the following are always true (when you first open the space):
-x is to your left, and +x is to your right
-y is down, while +y is up
-z is forward, and +z is backward (behind you) I’m not sure I love that last z-direction decision, but it’s how it works.
Note that animating a transform is as easy as this code snippet:
.gesture(TapGesture().targetedToAnyEntity().onEnded { value in
    var transform = value.entity.transform
    transform.translation += SIMD3(0.1, 0, -0.1)
    value.entity.move(
        to: transform,
        relativeTo: nil,
        duration: 3,
        timingFunction: .easeInOut
    )
})
I have a long list of things to explore next, but at some point in the near future I’ll be exploring drawing and transforms and coordinate spaces in what apple is calling “volumes”. (Volumes are 3D windows, or bounded boxes, essentially.)
I never have enough time to work on the games that I make. So when I am working on them, I want to stay focused on the game screen, and spend as little time as possible writing the other boring (but still necessary!) screens for the App. Apple’s SwiftUI framework is very easy to use, and if you don’t much care about making things pixel-perfect, it can sure save a lot of time.
I am not yet convinced that SwiftUI is all that great at navigation, however. I feel like I only just got used to coordinators in UIKit (admittedly many years ago now), and maybe I’m still in the honeymoon stage with them or something.
So for my latest game, Blither, and somewhat by extension this open source Hexagon Grid Generator that I released, I’m using SwiftUI for all the straightforward UI, SpriteKit for the “interesting” views (game and grid), and UIKit mostly just for its UIViewControllers.
In Blither, I have a single UINavigationViewController, and a class named AppCoordinator that manages the navigation stack. It looks like this:
public final class AppCoordinator {

    public enum Route: Int {
        case about
        case appIcon
        case back
        case game
        case mainMenu
        case newGameConfig
        case options
        case rules
        case stats
    }

    public let navigationController: UINavigationController = {
        let controller = UINavigationController()
        return controller
    }()

    public func navigate(to route: Route) {
        if let presented = navigationController.presentedViewController {
            presented.dismiss(animated: true)
        }
        switch route {
        case .about:
            let viewController = AboutViewController()
            navigationController.pushViewController(viewController, animated: true)
        case .appIcon:
            let viewController = AppIconSceneViewController()
            navigationController.pushViewController(viewController, animated: true)
        case .back:
            navigationController.popViewController(animated: true)
        case .game:
            if let topVC = navigationController.topViewController, topVC is GameViewController {
                // already showing the GameViewController, so pop first
                navigationController.popViewController(animated: true)
            }
            let gameViewController = GameViewController(coordinator: self)
            navigationController.pushViewController(gameViewController, animated: true)
        case .mainMenu:
            if let topVC = navigationController.topViewController, topVC is MenuViewController {
                return // already showing the MenuViewController
            }
            let menuViewController = MenuViewController(coordinator: self)
            navigationController.pushViewController(menuViewController, animated: true)
        case .newGameConfig:
            let configVC = PlayerConfigurationViewController(coordinator: self)
            navigationController.present(configVC, animated: true)
        case .options:
            let viewController = OptionsViewController(coordinator: self)
            navigationController.pushViewController(viewController, animated: true)
        case .rules:
            let rulesViewController = RulesViewController(coordinator: self)
            navigationController.pushViewController(rulesViewController, animated: true)
        case .stats:
            let viewController = StatsViewController(coordinator: self)
            navigationController.pushViewController(viewController, animated: true)
        }
    }
}
That may look like a lot, but if you look closely, almost every switch case is the same. The AppCoordinator instance is created in the app delegate’s standard didFinishLaunching function:
@main
class AppDelegate: UIResponder, UIApplicationDelegate {

    /// The root coordinator for the app.
    var appCoordinator: AppCoordinator?

    /// The main window
    var window: UIWindow?

    func application(
        _ application: UIApplication,
        didFinishLaunchingWithOptions launchOptions: [UIApplication.LaunchOptionsKey: Any]?
    ) -> Bool {

        let window = UIWindow(frame: UIScreen.main.bounds)

        let appCoordinator = AppCoordinator()
        self.appCoordinator = appCoordinator

        window.rootViewController = appCoordinator.navigationController
        window.makeKeyAndVisible()
        self.window = window

        Blither.setup()

        appCoordinator.navigate(to: .mainMenu)

        return true
    }
}
All of those View Controllers getting created in the AppCoordinator are UIHostingController subclasses, and look almost exactly like this one for the main menu:
public final class MenuViewController: UIHostingController<MenuView> {

    private weak var coordinator: AppCoordinator?

    init(coordinator: AppCoordinator? = nil) {
        self.coordinator = coordinator
        let menuView = MenuView(coordinator: coordinator)
        super.init(rootView: menuView)
    }

    @MainActor required dynamic init?(coder aDecoder: NSCoder) {
        fatalError("init(coder:) has not been implemented")
    }
}
If you’ve worked with SwiftUI and UIKit together before, you’ll recognize the UIHostingController, but even if you haven’t, all you really need to know is that MenuView is a standard SwiftUIView, meaning it’s dramatically fewer lines of code to add something like a button. And because it also holds a reference to the AppCoordinator, the definition for a button can look like this one:
                Button("Read the Rules", action: {
                    coordinator?.navigate(to: .rules)
                })
When that’s tapped, the coordinator pushes the RulesViewController onto the stack.
If I wanted, I could get rid of the coordinator reference, and do something like this:
…but I don’t like how that looks quite as much, and it also closes the door on dependency injection.
Hopefully you can appreciate how simple this all is! I’ve been pretty happy with how easy I found it to create new screens using this framework. Let me know in the comments or over on mastadon if you have done something similar, as I’d love to hear about similar approaches.
I love working in Xcode. It was my first “real” IDE experience, and while I still use vim pretty regularly it’s generally not for editing code (anymore). These days, whenever I’m not working in Xcode (lately it’s almost always Visual Studio on Unity projects), I’m wishing I was.
I read iOS Dev Weekly (https://iosdevweekly.com/) most weeks, and it was via that lovely resource that I discovered this great GitHub page full of Xcode-Tips (https://xcode-tips.github.io/). I already helped include one tip there (about enabling spell-check), and this post is inspired by one of the tips I found there in particular, about using `cmd-shift-j`.
Xcode is a 3 panel layout. The middle panel where you actually edit code can be split up in a number of ways, (tabs within tabs? c’mon), but I won’t go into that in this post.
The left panel is called the “Navigator”. It has tabs across the top and defaults to the first tab, or “Project Navigator”, showing all the files in your project hierarchy.
Filesystem tip/aside: When I first started using Xcode I was surprised to learn that files presented here are not necessarily 1-to-1 with the files on the filesystem. On one of my current projects, we are using the awesome open source XcodeGen (https://github.com/yonaskolb/XcodeGen) to generate the project from files on the filesystem. It’s actually called from a script that we run from a git checkout-hook, so we almost never have to think about it. This was a new-to-me workflow, but has a lot of benefits, including keeping the project files consistent with the filesystem!
Keyboard shortcuts relevant to the navigator:
Hide (or show) the whole Navigator pane with `cmd-0`. (That’s a zero.)
Jump to any of the tabs in the navigator with `cmd-<number>` where number is the index of the tab. So `cmd-1` opens the Project Navigator. This works even when the Navigator is hidden!
Best of all, the aforementioned `cmd-shift-j` will open the Project Navigator and select the file you are currently editing. You can then use the up or down arrows to browse different files, and `cmd-j` and then `enter` to return to the code editor.
The panel on the right side of Xcode is the Inspector. It too has tabs, and what’s great is that the keyboard shortcuts are very similar to the ones for the Navigator, but with the addition of alt:
Show/Hide the Inspector with `cmd-alt-0`.
You can also jump to one of the tabs with `cmd-alt-<number>`, again, where number is the index of the tab. What’s interesting here is that there are a different number of tabs here if you are editing an interface builder file. (I don’t think I’ve ever used these shortcuts.)
In general, I am far more likely to want to hide the Inspector pane than the Navigator pane, so it’s kind of a shame the shortcuts to show/hide them aren’t reversed (not to mention the fact that cmd-alt is a difficult combination on my Moonlander keyboard, but of course I could fix that).
I wrote this up in part so I can create another PR and reference myself as the source for a tip about showing and hiding these panes, but this post was also inspired by sharing with another member of my team that I do the majority of my development on a MacBook, without external monitor. <insert scream emoji> One of the aspects that makes that experience tolerable are all these keyboard shortcuts that let you maximize the space you’re using to edit code quickly and easily.
I hope you learned something from this, but if you didn’t, go check out that Xcode-Tips site, because you’re sure to learn something there!
First of all, the update to Catchup I mentioned a while back is finally live in the app store today! This got hung up a bit because Nick wanted me to make the new catchup rule the default. I told him I would definitely do this if he would handle translations of the rules update. (But of course wrangling a bunch of translators is much more difficult than the few lines of C++ needed to make the rule change itself!) So as of this writing, the rules change is still optional (and off by default). If and/or when we get some translated rules, I’ll probably push out another update to flip the default.
I’m also working on updates to some of my other apps. Unfortunately, it’s not really a straight-forward process, and there are some that will still probably not get an update at all. (Action Chess, for instance, just needs to be entirely re-written, which I’ve pretty much decided I’ll just do in Unity rather than go for iOS native.)
But in all the apps I’ve done so far, one thing I’ve had to do is change the code that shows the version number. I thought I’d write a mini-tutorial because this is kinda dumb. In pretty much all my apps, I previously had this block of code somewhere (usually in an AboutViewController class’s ViewDidLoad or ViewWillAppear method):
This results in a version number that looks something like v1.4.b2.
(It’s worth noting that I highly recommend putting a user-facing build number in your all your apps somewhere. This is super important for getting bug reports and feedback. The technique above allows your code to update that user-facing number without having to include it in your code directly.)
In case it’s not clear, self.versionLabel is a UILabel instance, either initialized in code elsewhere, or (more likely) in a Xib or StoryBoard.
Anyway, Apple put out a technical note about version numbers and build numbers back in 2015, but somehow I missed it. Now I’m not 100% sure about this (possible it’s just that I was always confused about this), but my theory is that, at some point (maybe around 2015), the CFBundleVersion key changed functionality, from the version number to build number, and the CFBundleShortVersionString was introduced as the new version number. (This is really difficult to google for, I tried, so if anyone has a more accurate historical rundown, I’d be interested in hearing it.) Anyway, both string are required, but the build number is specific to the version number. (I.E. both have to increment for actual releases, but if you bump the version, you can reset build number back to 0 or 1, or whatever.)
These values are changed in Xcode, in the general project settings. Worth noting that the version number is shown to the user in the app store, but I don’t think build number is exposed anywhere (that I’ve seen). I usually try to follow semantic versioning, with the actual version number containing the first two dots (major and minor version changes), and more or less use the build number as the third “patch” number.
I guess the thing I find the weirdest about these bundle keys is that neither one is named “build”. And I would expect the build number to be the shorter one, not the version number. But maybe that’s just me! Hope this helps someone.
Last week, as part of their initiative to clean up the app store, Apple marked two of my oldest apps as needing updates or they’ll be removed from the store (in 30 days). Since I don’t really have time to update them right now, I’m changed their pricing to free so everyone has a chance to download them before they’re removed. When I do get around to doing updates, I’ll definitely put them back back in the store as paid, so get ’em while they’re free!
These are games that I’m really proud to have made, so if you haven’t played ’em, please do go check them out. (And let me know what you think!) Enjoy!
As a programmer, one of the things I like to argue against is the concept of “magic code”, code that works because of some unseen bit of code elsewhere. In iOS, the principal is exemplified by “magic” methods you can include in various subclasses that do rather important things. Want to handle touches in your UIView? Just implement the method touchesBegan:withEvent:, touchesMoved:withEvent:, touchesEnded:withEvent:, and touchesCanceled:withEvent:, and you’re good to go. Want to set up your UIViewController‘s visual layout? Make sure you do so in the layoutSubviews method.
But how do you know about all these magic methods? This is definitely one of the questions that I found the most difficult when I first began iOS development. Learning about all this magic is basically the same thing as learning iOS development. Knowing Apple’s APIs is how you develop iOS apps. Knowing their quirks is how you get to be an expert.
But if you’re just starting out, it’s important to know that most of these magic methods are (generally, not always, but generally) defined in a protocol. When an object conforms to a protocol, it basically says that it (or one of its subclasses) will implement some set of methods. Want to know what protocols UIViewController conforms to? In Objective-C, you would simply open up its header and check it out. (Of course, a protocol might be defined even further up the chain, in one of the headers for a class the view controller inherits from.)
But how do you figure out what protocols a class conforms to in Swift? As near as I can tell, the only way is to open up Apple’s documentation. This seems like it would not be enough, since you might be working with a non-apple framework, or worse… it is possible (gasp) for Apple’s documentation to be spotty or outright incorrect. (I’ve done a few google searches, and read about 20 tutorials and blog posts, and I still don’t know how to figure this out from code alone, so I’m really asking this question. I’ve also started a stack overflow question on the topic.)
I don’t want this to be a “I think Objective-C is superior to Swift” post, but I do think there are legitimate reasons for header files, and this is one of them. Once you get beyond a certain level of iOS proficiency, poking around in those header files is akin to using the “view source” as an intermediate web developer. It’s one of the ways you learn how other people approach a problem.